Wednesday, April 19, 2017

Amazon "Polly"

The voices (and tech) used in Amazon Alexa, are available for anyone to play with, free of charge - search for Amazon Polly.  Here's the voice of "Geraint" (Welsh English) reading Lewis Carroll:


https://www.poetryfoundation.org/poems-and-poets/poems/detail/42916

Try Polly here: https://eu-west-1.console.aws.amazon.com/polly/home/SynthesizeSpeech

Wednesday, October 12, 2016

Shure wireless in-ear monitoring system

A friend lent me their Shure PSM300 P3T in-ear monitoring system today.  This is a top-of-the-line piece of kit for weekend-warrior type bands, costing over £600 for just one monitor mix.

http://www.shure.com/americas/products/personal-monitor-systems/psm-300-stereo-personal-monitor-system/p3t-half-rack-single-channel-wireless-transmitter

Turns out that the actual RF signal being transmitted is straightforward analog FM.
A £10 USB TV stick and the free SDR# software http://www.rtl-sdr.com/rtl-sdr-quick-start-guide/ can decode the signal and play it out of the sound card output in stereo.


Shure mentions that there is some "24 bit digital" processing - what they call "Patented Shure Audio Reference Companding".  The decoded PC signal does sound a bit swooshy compared to the actual Shure receiver unit, so that would suggest it is doing a bit of companding.


Monday, November 23, 2015

Differential line receiver for Behringer Ultranet

Prototype receiver circuit based on AM26LV32 chip:


The MagJack - a Bel Stewart SI-52008-F has datasheet here: http://www.farnell.com/datasheets/1731561.pdf

The IC cleans up the edges of the incoming signals.


With some level-shifting and AC coupling, the signals are OK to pass into an SPDIF receiver.

Friday, September 11, 2015

Audio test CD

For repairing amplifiers.
Left and right channels have identical signals. The files were created using the excellent shareware Goldwave audio editor.

Track listing is as follows:
1) 1000Hz sine wave
2) 1000Hz square wave
3) 1000Hz triangle wave
4) 440Hz sine wave
5) 20Hz sine wave
6) 20KHz sine wave
Each track is only 1 minute long, so use “Repeat” on your CD player to obtain a (nearly) continuous tone.
Don’t play this CD through your speakers, unless the volume is at minimum.
The audio tracks are recorded at 50% dynamic range, to avoid any clipping in the CD player itself (of course it should not do that, but my portable CD player used for testing is not perfect, maybe yours isn’t either).
Download  a ZIP of the .ISO and .CUE file ready for burning with your favourite CD writing software.

Monday, September 07, 2015

XMOS StartKit - write performance of Sandisk memory card

Here's a graph showing the write performance to a Sandisk Class 10 memory card.


The reason for the sharp dips in performance, are that the FAT filing system has to go off and allocate a new cluster every N writes.  For example 512 byte sectors, 32Kbyte clusters, means a new cluster is needed every 64 writes.

Another factor on the XMOS board is whether the code is running in 'debug' or 'release' mode. This can make around 2x difference.

I also found that the code published on https://github.com/xcore/sc_sdcard seems to not pay attention to setup and hold times, and appears to be leaving the clock line in a logic "1" state when in fact data gets clocked on a logic 0 -> 1 transition.

All this led me to branch the repo and produce my own version, here: https://github.com/tuck1s/sc_sdcard

The changes are too numerous to list here (see the github changelog) but with pre-allocation of a file with contiguous sectors, and a Sandisk Extreme Pro SDcard, there's enough performance to write around 3Mbytes/s to the card.

My experiments with the even smaller "PetitFAT" filing system were halted because it only reads/writes a sector at a time and that would not give enough performance.

Measuring 'where the time goes', I can see that the time taken to clock in a sector's worth is usually only a few hundred microseconds, whereas the card can then take several milliseconds to respond that it's done. This is highly variable and also highly dependent on the grade of the SD card.

Monday, August 31, 2015

XMOS StartKit - reading and writing to SD card

Being able to read/write information from an SD card is probably the easiest way to get large amounts of non-volatile storage into an embedded project.
I'm using XMOS StartKit,, with the code from here

The card reader is a part from Wurth Elektronik, Farnell / CPC part number CN18143 available here.


The data and clock lines have 120 ohm series resistors, as this can help to absorb transmission-line reflections on the connecting wires (even though they are fairly short).

In addition, pins 2 and 7 have 10K ohm pull up resistors.

Pins on an SD card are numbered from 9 (the chamfered end), then 1 to 8.  This is because very early cards, like the one shown above, have no pin 9.

SD cards run from 3.3v, so this can be provided directly from the StartKit board.

The XMOS code supports both 1-bit (SPI mode) and 4-bit data access mode.  Initially the code is set to use 1-bit SPI mode.

As well as GND and 3.3V, SPI mode only requires pins:

1  CS
2  MOSI
5  SCLK
7  MISO

These are connected up and monitored on the scope.

The signal quality looks OK.

The very old 16Mbyte card that I started with, would not read/write (it gave reason code=3).

A newer 16GB card read/wrote OK, as follows:


15026112 KB total drive space.
15748096 KB available.

Deleting file Data.bin if existing...done.

Creating a new file Data.bin...done.

Writing data to the file...20480 bytes written. Write rate: 215KBytes/Sec

Closing the file...done.

Opening an existing file: Data.bin...done.

Reading file content...20480 bytes read. Read rate: 275KBytes/Sec

Closing the file...done.

Open root directory.

Directory listing...
   <dir>  DCIM
   <dir>  MISC
   <dir>  PRIVATE
    4096  ~1.TRA
   20480  DATA.BIN
   <dir>  TRASHE~1
   <dir>  SYSTEM~1

Test completed.

The file SDCardHostSPI.xc contains the XMOS port mappings for these lines, as follows.  I've used these unchanged in this test.

static SDHostInterface SDif[] = // LIST HERE THE PORTS USED FOR THE INTERFACES
//                                    cs,        sclk,        Mosi,         miso
{XS1_CLKBLK_1, XS1_CLKBLK_2, XS1_PORT_1O, XS1_PORT_1M, XS1_PORT_1N, XS1_PORT_1P, 0, 0}; // resources used for interface #0

The ports map onto StartKit pins as follows:
SD card 1 CS = XMOS J7 pin 21 = Port 1O
SD card 2 MOSI = XMOS J7 pin 17 = Port 1N
SD card 5 SCLK = XMOS J7 pin 15 = Port 1M
SD card 7 MISO = XMOS J7 pin 23 = Port 1P

Monday, August 24, 2015

Rigol DS1054Z digital storage scope - decoding I2S signals

I recently got one of these great little digital scopes.  It has a few serial bus decoding packages (on a try-before-buy basis).  You get 36 hours to play with them.  Unfortunately they don't include I2S bus decoding.  I2S is a bus standard commonly used for transferring digital audio around, for example between ADCs and DACs.

No matter! You can capture and export full-resolution traces of signals via a USB memory stick. This seems to work best if the stick is FAT formatted rather than FAT32.  The file format is .CSV which is great for importing into Excel and viewing.  You can then use Excel's charting function to provide a decode of your signals with much greater time-resolution than you can see on the scope's display itself (which is still pretty good).  For example


You can also parse the .CSV file and decode signals quite easily using scripting languages such as PHP, giving outputs in binary, hex or whatever you like - e.g.

Using logic threshold of 1.900000 volts
00000000 00001000 00000000 001 Bits:27 Hex: 00004001 #0:64
     540 LRCLK edge    1: 00000000 00000000 00110000 00000001  Bits:32 Hex: 00003001 #1:48
    1191 LRCLK edge    2: 00000000 00000000 00010000 00000001  Bits:32 Hex: 00001001 #2:16
    1842 LRCLK edge    3: 00000000 00000000 01010000 00000001  Bits:32 Hex: 00005001 #3:80
    2494 LRCLK edge    4: 11111010 10000011 11110000 00000001  Bits:32 Hex: fa83f001 #4:-359440
    3145 LRCLK edge    5: 00000000 00000000 00100000 00000001  Bits:32 Hex: 00002001 #5:32
    3796 LRCLK edge    6: 00000000 00000000 00010000 00000001  Bits:32 Hex: 00001001 #6:16
    4447 LRCLK edge    7: 00000000 00000000 00010000 00000001  Bits:32 Hex: 00001001 #7:16
    5098 LRCLK edge    8: 11111111 11111111 10100000 00000001  Bits:32 Hex: ffffa001 #0:-96
    5749 LRCLK edge    9: 00000000 00000000 00010000 00000001  Bits:32 Hex: 00001001 #1:16
    6400 LRCLK edge   10: 11111111 11111111 11000000 00000001  Bits:32 Hex: ffffc001 #2:-64
Here's the code - updated to read the signals on the correct edge
<?php

// Decode I2S data captured in CSV file from Rigol DS1054Z scope
// Assumptions:  First two rows in the file are header lines - skip these.
//
// Channels are arranged as :  CH1 = BCLK, CH2 = LRCLK, CH3 = DOUT,  CH4 = scopetrig

// Command line parameters: <inputfile> <voltage threshold>
// threshold of 1.8 or 1.9 volts seems to be reliable with 3.3v logic.
//
// Fixed to toggle in data on rising edges of BCLK

if($argv[1] == "") {
 exit("Usage: ".$argv[0]." input_file [voltage_threshold]\n");
}

// Get parameters
$fp = fopen($argv[1], "r");

if($argv[2] == "") {
 $threshold = 1.8;
 }
else {
 $threshold = (float)$argv[2];  //Volts
}


if(is_numeric($threshold)) {
 print("Using logic threshold of ".sprintf("%f", $threshold)." volts\n");
}
else {
 exit("voltage threshold must be a numeric value");
}

// Skip the two expected header lines
$ln = fgetcsv($fp);
$ln = fgetcsv($fp);

$i=1;

// Get the first line of real data in
$ln = fgetcsv($fp);
$bclk = $ln[0];
$lrclk = $ln[1];
$dout = $ln[2];

// Set up initial trigger conditions
$bclkTrig = $bclk;
$lrclkTrig = $lrclk;

//Count edges as they happen
$bclkEdgeCount = 0;
$lrclkEdgeCount = 0;
$doneLSB = false;

// Collect bits into this shift register
$bitcount = 0;
$doutShiftReg = 0;

while(!feof($fp)) {
 $i=$i+1;
 $ln = fgetcsv($fp);

 $bclk = $ln[0];
 $lrclk = $ln[1];
 $dout = $ln[2];

 // Check for a RISING edge in BCLK
 if(($bclkTrig <$threshold) && ($bclk >= $threshold) ) {
  $bclkEdgeCount++;

  // Check if the LRCLK line has changed state since the last edge
  if( ($lrclkTrig >$threshold) <> ($lrclk >$threshold)) {
   // Dump out hex value accumulated so far, the count of bits in this sample, and decimal equivalent
   $hexnum = sprintf("%08x", $doutShiftReg);

   // Handle 2-s complement sign conversion for the 24-bit audio
   $signedSample = $doutShiftReg >> 8;
   if($signedSample >= 2**23 -1) {
    $signedSample = $signedSample - (2**24);
   }

   echo " Bits:".$bitcount." Hex: ".$hexnum." #".($lrclkEdgeCount %8).":".$signedSample;
   $lrclkEdgeCount++;
   echo "\n".sprintf("%8d",$i)." LRCLK edge ".sprintf("%4d",$lrclkEdgeCount).": ";
   $lrclkTrig = $lrclk;

   // Start accumulating bits into the shift register
   $bitcount = 0;
   $doutShiftReg = 0;
  }


  // output raw data, and accumulate it into shift register
  if($dout > $threshold) $doutBit = 1; else $doutBit = 0;
  echo $doutBit;
  $bitcount++;
  if($bitcount %8 == 0) echo " ";    // pretty-print spacing

  $doutShiftReg = ($doutShiftReg <<1) + $doutBit;
 }
 // this is the new value we'll compare against
 $bclkTrig = $bclk;

}
echo "\n";
?>
Using the program, it's possible to capture I2S signals and decode them as follows. This is data from a Behringer P16I device, through a Wolfson WM8804 evaulation board:
Using logic threshold of 1.900000 volts
0000001 Bits:7 Hex: 00000001 #0:0
     132 LRCLK edge    1: 11111111 11111111 11000000 00000001  Bits:32 Hex: ffffc001 #1:-64
     783 LRCLK edge    2: 11111111 11111111 10100000 00000001  Bits:32 Hex: ffffa001 #2:-96
    1434 LRCLK edge    3: 11111111 11111111 01100000 00000001  Bits:32 Hex: ffff6001 #3:-160
    2086 LRCLK edge    4: 11111111 11111111 01110000 00000001  Bits:32 Hex: ffff7001 #4:-144
    2737 LRCLK edge    5: 00000000 00000000 00100000 00000001  Bits:32 Hex: 00002001 #5:32
    3388 LRCLK edge    6: 11111111 11111111 11010000 00000001  Bits:32 Hex: ffffd001 #6:-48
    4039 LRCLK edge    7: 11111111 11111111 10010000 00000001  Bits:32 Hex: ffff9001 #7:-112
    4690 LRCLK edge    8: 00000000 00000000 01100000 00000001  Bits:32 Hex: 00006001 #0:96
    5341 LRCLK edge    9: 11111111 11111110 11110000 00000001  Bits:32 Hex: fffef001 #1:-272
    5992 LRCLK edge   10: 11111111 11111111 10110000 00000001  Bits:32 Hex: ffffb001 #2:-80
    6643 LRCLK edge   11: 00000000 00000000 01110000 00000001  Bits:32 Hex: 00007001 #3:112
    7294 LRCLK edge   12: 00000000 00000000 11010000 00000001  Bits:32 Hex: 0000d001 #4:208
    7945 LRCLK edge   13: 00000000 00000000 01100000 00000001  Bits:32 Hex: 00006001 #5:96
    8596 LRCLK edge   14: 00000000 00000000 00010000 00000001  Bits:32 Hex: 00001001 #6:16
    9247 LRCLK edge   15: 00000000 00000000 10010000 00000001  Bits:32 Hex: 00009001 #7:144
    9898 LRCLK edge   16: 11111111 11111111 01010000 00000001  Bits:32 Hex: ffff5001 #0:-176
   10549 LRCLK edge   17: 11111111 11111111 10110000 00000001  Bits:32 Hex: ffffb001 #1:-80
   11200 LRCLK edge   18: 00000000 00000000 01000000 00000001  Bits:32 Hex: 00004001 #2:64
   11851 LRCLK edge   19: 00000000 00000000 01100000 00000001  Bits:32 Hex: 00006001 #3:96
   12502 LRCLK edge   20: 11111111 11111111 10110000 00000001  Bits:32 Hex: ffffb001 #4:-80
   13153 LRCLK edge   21: 00000000 00000000 10100000 00000001  Bits:32 Hex: 0000a001 #5:160
   13804 LRCLK edge   22: 00000000 00000000 00010000 00000001  Bits:32 Hex: 00001001 #6:16
   14455 LRCLK edge   23: 11111111 11111111 10000000 00000001  Bits:32 Hex: ffff8001 #7:-128
   15106 LRCLK edge   24: 00000000 00000000 10000000 00000001  Bits:32 Hex: 00008001 #0:128
   15758 LRCLK edge   25: 11111111 11111111 10010000 00000001  Bits:32 Hex: ffff9001 #1:-112
   16409 LRCLK edge   26: 11111111 11111111 10100000 00000001  Bits:32 Hex: ffffa001 #2:-96
   17060 LRCLK edge   27: 00000000 00000000 00000000 00000001  Bits:32 Hex: 00000001 #3:0
   17711 LRCLK edge   28: 00000000 00000000 00000000 00000001  Bits:32 Hex: 00000001 #4:0
   18362 LRCLK edge   29: 00000000 00000000 11100000 00000001  Bits:32 Hex: 0000e001 #5:224
   19013 LRCLK edge   30: 00000000 00000000 10000000 00000001  Bits:32 Hex: 00008001 #6:128
   19664 LRCLK edge   31: 00000000 00000000 01010000 00000001  Bits:32 Hex: 00005001 #7:80
   20315 LRCLK edge   32: 00000000 00000000 10100000 00000001  Bits:32 Hex: 0000a001 #0:160
   20966 LRCLK edge   33: 11111111 11111111 11000000 00000001  Bits:32 Hex: ffffc001 #1:-64
   21617 LRCLK edge   34: 11111111 11111110 11110000 00000001  Bits:32 Hex: fffef001 #2:-272
   22268 LRCLK edge   35: 11111111 11111111 10100000 00000001  Bits:32 Hex: ffffa001 #3:-96
   22919 LRCLK edge   36: 00000000 00000000 00110000 00000001  Bits:32 Hex: 00003001 #4:48
   23570 LRCLK edge   37: 00000000 00000000 01000000 00000001  Bits:32 Hex: 00004001 #5:64
   24221 LRCLK edge   38: 11111111 11111111 11100000 00000001  Bits:32 Hex: ffffe001 #6:-32
   24872 LRCLK edge   39: 11111111 11111111 11100000 00000001  Bits:32 Hex: ffffe001 #7:-32
   25523 LRCLK edge   40: 11111111 11111111 11110000 00000001  Bits:32 Hex: fffff001 #0:-16
   26174 LRCLK edge   41: 00000000 00000000 10010000 00000001  Bits:32 Hex: 00009001 #1:144
   26825 LRCLK edge   42: 00000000 00000000 01010000 00000001  Bits:32 Hex: 00005001 #2:80
   27476 LRCLK edge   43: 11111111 11111111 10000000 00000001  Bits:32 Hex: ffff8001 #3:-128
   28127 LRCLK edge   44: 11111111 11111111 01110000 00000001  Bits:32 Hex: ffff7001 #4:-144
   28778 LRCLK edge   45: 00000000 00000001 00000000 00000001  Bits:32 Hex: 00010001 #5:256
   29429 LRCLK edge   46: 11111111 11111111 11110000 00000001  Bits:32 Hex: fffff001 #6:-16
   30080 LRCLK edge   47: 00000000 00000000 01000000 00000001  Bits:32 Hex: 00004001 #7:64
   30732 LRCLK edge   48: 11111111 11111111 00110000 00000001  Bits:32 Hex: ffff3001 #0:-208
   31383 LRCLK edge   49: 00000000 00000000 00010000 00000001  Bits:32 Hex: 00001001 #1:16
   32034 LRCLK edge   50: 00000000 00000000 01000000 00000001  Bits:32 Hex: 00004001 #2:64
   32685 LRCLK edge   51: 00000000 00000000 01110000 00000001  Bits:32 Hex: 00007001 #3:112
   33336 LRCLK edge   52: 11111111 11111111 10010000 00000001  Bits:32 Hex: ffff9001 #4:-112
   33987 LRCLK edge   53: 11111111 11111111 00100000 00000001  Bits:32 Hex: ffff2001 #5:-224
   34638 LRCLK edge   54: 11111111 11111111 01100000 00000001  Bits:32 Hex: ffff6001 #6:-160
   35289 LRCLK edge   55: 11111111 11111111 01100000 00000001  Bits:32 Hex: ffff6001 #7:-160
   35940 LRCLK edge   56: 00000000 00000000 00100000 00000001  Bits:32 Hex: 00002001 #0:32
   36591 LRCLK edge   57: 00000000 00000000 01000000 00000001  Bits:32 Hex: 00004001 #1:64
   37242 LRCLK edge   58: 00000000 00000000 00000000 00000001  Bits:32 Hex: 00000001 #2:0
   37893 LRCLK edge   59: 00000000 00000000 01010000 00000001  Bits:32 Hex: 00005001 #3:80
   38544 LRCLK edge   60: 00000000 00000001 00010000 00000001  Bits:32 Hex: 00011001 #4:272
   39195 LRCLK edge   61: 11111111 11111111 11100000 00000001  Bits:32 Hex: ffffe001 #5:-32
   39846 LRCLK edge   62: 11111111 11111111 11100000 00000001  Bits:32 Hex: ffffe001 #6:-32
   40497 LRCLK edge   63: 00000000 00000000 01110000 00000001  Bits:32 Hex: 00007001 #7:112
   41148 LRCLK edge   64: 11111111 11111111 11110000 00000001  Bits:32 Hex: fffff001 #0:-16
   41799 LRCLK edge   65: 00000000 00000000 00000000 00000001  Bits:32 Hex: 00000001 #1:0
   42450 LRCLK edge   66: 11111111 11111111 10000000 00000001  Bits:32 Hex: ffff8001 #2:-128
   43101 LRCLK edge   67: 11111111 11111110 11100000 00000001  Bits:32 Hex: fffee001 #3:-288
   43753 LRCLK edge   68: 11111111 11111111 10010000 00000001  Bits:32 Hex: ffff9001 #4:-112
   44403 LRCLK edge   69: 00000000 00000000 10000000 00000001  Bits:32 Hex: 00008001 #5:128
   45054 LRCLK edge   70: 00000000 00000000 10000000 00000001  Bits:32 Hex: 00008001 #6:128
   45706 LRCLK edge   71: 00000000 00000000 10100000 00000001  Bits:32 Hex: 0000a001 #7:160
   46357 LRCLK edge   72: 11111111 11111111 01100000 00000001  Bits:32 Hex: ffff6001 #0:-160
   47008 LRCLK edge   73: 11111111 11111111 10000000 00000001  Bits:32 Hex: ffff8001 #1:-128
   47659 LRCLK edge   74: 11111111 11111111 11010000 00000001  Bits:32 Hex: ffffd001 #2:-48
   48310 LRCLK edge   75: 11111111 11111111 01010000 00000001  Bits:32 Hex: ffff5001 #3:-176
   48961 LRCLK edge   76: 00000000 00000000 01000000 00000001  Bits:32 Hex: 00004001 #4:64
   49612 LRCLK edge   77: 00000000 00000000 01110000 00000001  Bits:32 Hex: 00007001 #5:112
   50263 LRCLK edge   78: 11111111 11111111 01110000 00000001  Bits:32 Hex: ffff7001 #6:-144
   50914 LRCLK edge   79: 00000000 00000000 11110000 00000001  Bits:32 Hex: 0000f001 #7:240
   51565 LRCLK edge   80: 00000000 00000000 01100000 00000001  Bits:32 Hex: 00006001 #0:96
   52216 LRCLK edge   81: 11111111 11111110 11110000 00000001  Bits:32 Hex: fffef001 #1:-272
   52867 LRCLK edge   82: 11111111 11111111 10000000 00000001  Bits:32 Hex: ffff8001 #2:-128
   53518 LRCLK edge   83: 00000000 00000000 00010000 00000001  Bits:32 Hex: 00001001 #3:16
   54169 LRCLK edge   84: 00000000 00000000 10010000 00000001  Bits:32 Hex: 00009001 #4:144
   54820 LRCLK edge   85: 00000000 00000000 10110000 00000001  Bits:32 Hex: 0000b001 #5:176
   55471 LRCLK edge   86: 00000000 00000000 10010000 00000001  Bits:32 Hex: 00009001 #6:144
   56122 LRCLK edge   87: 11111111 11111111 10100000 00000001  Bits:32 Hex: ffffa001 #7:-96
   56773 LRCLK edge   88: 00000000 00000000 00100000 00000001  Bits:32 Hex: 00002001 #0:32
   57424 LRCLK edge   89: 11111111 11111111 11110000 00000001  Bits:32 Hex: fffff001 #1:-16
   58075 LRCLK edge   90: 00000000 00000000 10000000 00000001  Bits:32 Hex: 00008001 #2:128
   58727 LRCLK edge   91: 00000000 00000000 01110000 00000001  Bits:32 Hex: 00007001 #3:112
   59378 LRCLK edge   92: 00000000 00000000 10110000 00000001  Bits:32 Hex: 0000b001 #4:176
   60029 LRCLK edge   93: 00000000 00000000 00110000 00000001  Bits:32 Hex: 00003001 #5:48
   60680 LRCLK edge   94: 00000000 00000000 10110000 00000001  Bits:32 Hex: 0000b001 #6:176
   61331 LRCLK edge   95: 11111111 11111111 01010000 00000001  Bits:32 Hex: ffff5001 #7:-176
   61982 LRCLK edge   96: 11111111 11111111 11100000 00000001  Bits:32 Hex: ffffe001 #0:-32
   62633 LRCLK edge   97: 11111111 11111111 10100000 00000001  Bits:32 Hex: ffffa001 #1:-96
   63284 LRCLK edge   98: 11111111 11111111 11010000 00000001  Bits:32 Hex: ffffd001 #2:-48
   63935 LRCLK edge   99: 11111111 11111111 11110000 00000001  Bits:32 Hex: fffff001 #3:-16
   64586 LRCLK edge  100: 11111111 11111111 10100000 00000001  Bits:32 Hex: ffffa001 #4:-96
   65237 LRCLK edge  101: 00000000 00000000 01100000 00000001  Bits:32 Hex: 00006001 #5:96
   65888 LRCLK edge  102: 11111111 11111111 11100000 00000001  Bits:32 Hex: ffffe001 #6:-32
   66539 LRCLK edge  103: 11111111 11111111 11110000 00000001  Bits:32 Hex: fffff001 #7:-16
   67190 LRCLK edge  104: 11111111 11111111 10010000 00000001  Bits:32 Hex: ffff9001 #0:-112
   67841 LRCLK edge  105: 11111111 11111111 11110000 00000001  Bits:32 Hex: fffff001 #1:-16
   68492 LRCLK edge  106: 11111111 11111111 01110000 00000001  Bits:32 Hex: ffff7001 #2:-144
   69143 LRCLK edge  107: 00000000 00000000 10010000 00000001  Bits:32 Hex: 00009001 #3:144
   69794 LRCLK edge  108: 11111111 11111111 11100000 00000001  Bits:32 Hex: ffffe001 #4:-32
   70445 LRCLK edge  109: 11111111 11111111 10010000 00000001  Bits:32 Hex: ffff9001 #5:-112
   71096 LRCLK edge  110: 00000000 00000000 00000000 00000001  Bits:32 Hex: 00000001 #6:0
   71747 LRCLK edge  111: 00000000 00000000 10110000 00000001  Bits:32 Hex: 0000b001 #7:176
   72399 LRCLK edge  112: 00000000 00000000 11010000 00000001  Bits:32 Hex: 0000d001 #0:208
   73050 LRCLK edge  113: 11111111 11111111 11110000 00000001  Bits:32 Hex: fffff001 #1:-16
   73701 LRCLK edge  114: 11111111 11111111 01110000 00000001  Bits:32 Hex: ffff7001 #2:-144
   74352 LRCLK edge  115: 11111111 11111111 01100000 00000001  Bits:32 Hex: ffff6001 #3:-160
   75003 LRCLK edge  116: 11111111 11111111 11110000 00000001  Bits:32 Hex: fffff001 #4:-16
   75654 LRCLK edge  117: 11111111 11111111 10110000 00000001  Bits:32 Hex: ffffb001 #5:-80
   76305 LRCLK edge  118: 11111111 11111111 10110000 00000001  Bits:32 Hex: ffffb001 #6:-80
   76956 LRCLK edge  119: 11111111 11111111 10110000 00000001  Bits:32 Hex: ffffb001 #7:-80
   77607 LRCLK edge  120: 11111111 11111111 11010000 00000001  Bits:32 Hex: ffffd001 #0:-48
   78258 LRCLK edge  121: 11111111 11111111 11010000 00000001  Bits:32 Hex: ffffd001 #1:-48
   78909 LRCLK edge  122: 11111111 11111111 11010000 00000001  Bits:32 Hex: ffffd001 #2:-48
   79560 LRCLK edge  123: 11111111 11111111 01110000 00000001  Bits:32 Hex: ffff7001 #3:-144
   80211 LRCLK edge  124: 11111111 11111111 01110000 00000001  Bits:32 Hex: ffff7001 #4:-144
   80862 LRCLK edge  125: 11111111 11111111 11100000 00000001  Bits:32 Hex: ffffe001 #5:-32
   81513 LRCLK edge  126: 11111111 11111111 11010000 00000001  Bits:32 Hex: ffffd001 #6:-48
   82164 LRCLK edge  127: 11111111 11111111 10100000 00000001  Bits:32 Hex: ffffa001 #7:-96
   82815 LRCLK edge  128: 00000000 00000000 01100000 00000001  Bits:32 Hex: 00006001 #0:96
   83466 LRCLK edge  129: 00000000 00000000 00100000 00000001  Bits:32 Hex: 00002001 #1:32
   84117 LRCLK edge  130: 00000000 00000000 10000000 00000001  Bits:32 Hex: 00008001 #2:128
   84768 LRCLK edge  131: 00000000 00000000 11110000 00000001  Bits:32 Hex: 0000f001 #3:240
   85420 LRCLK edge  132: 00000000 00000000 01010000 00000001  Bits:32 Hex: 00005001 #4:80
   86071 LRCLK edge  133: 00000000 00000000 00110000 00000001  Bits:32 Hex: 00003001 #5:48
   86722 LRCLK edge  134: 11111111 11111111 11000000 00000001  Bits:32 Hex: ffffc001 #6:-64
   87373 LRCLK edge  135: 11111111 11111111 10010000 00000001  Bits:32 Hex: ffff9001 #7:-112
   88024 LRCLK edge  136: 11111111 11111111 11110000 00000001  Bits:32 Hex: fffff001 #0:-16
   88675 LRCLK edge  137: 11111111 11111111 10100000 00000001  Bits:32 Hex: ffffa001 #1:-96
   89326 LRCLK edge  138: 00000000 00000001 00000000 00000001  Bits:32 Hex: 00010001 #2:256
   89977 LRCLK edge  139: 11111111 11111111 10010000 00000001  Bits:32 Hex: ffff9001 #3:-112
   90628 LRCLK edge  140: 00000000 00000000 10000000 00000001  Bits:32 Hex: 00008001 #4:128
   91279 LRCLK edge  141: 00000000 00000000 00010000 00000001  Bits:32 Hex: 00001001 #5:16
   91930 LRCLK edge  142: 00000000 00000000 11000000 00000001  Bits:32 Hex: 0000c001 #6:192
   92581 LRCLK edge  143: 00000000 00000000 00010000 00000001  Bits:32 Hex: 00001001 #7:16
   93232 LRCLK edge  144: 11111111 11111111 01000000 00000001  Bits:32 Hex: ffff4001 #0:-192
   93883 LRCLK edge  145: 00000000 00000000 11000000 00000001  Bits:32 Hex: 0000c001 #1:192
   94534 LRCLK edge  146: 00000000 00000000 00100000 00000001  Bits:32 Hex: 00002001 #2:32
   95185 LRCLK edge  147: 00000000 00000000 01000000 00000001  Bits:32 Hex: 00004001 #3:64
   95836 LRCLK edge  148: 11111111 11111111 10100000 00000001  Bits:32 Hex: ffffa001 #4:-96
   96487 LRCLK edge  149: 11111111 11111111 10110000 00000001  Bits:32 Hex: ffffb001 #5:-80
   97138 LRCLK edge  150: 00000000 00000000 01110000 00000001  Bits:32 Hex: 00007001 #6:112
   97789 LRCLK edge  151: 11111111 11111111 10110000 00000001  Bits:32 Hex: ffffb001 #7:-80
   98440 LRCLK edge  152: 00000000 00000000 00110000 00001001  Bits:32 Hex: 00003009 #0:48
   99091 LRCLK edge  153: 11111111 11111111 10100000 00001001  Bits:32 Hex: ffffa009 #1:-96
   99742 LRCLK edge  154: 11111111 11111111 11010000 00000001  Bits:32 Hex: ffffd001 #2:-48
  100394 LRCLK edge  155: 00000000 00000000 10100000 00000001  Bits:32 Hex: 0000a001 #3:160
  101045 LRCLK edge  156: 00000000 00000000 00110000 00000001  Bits:32 Hex: 00003001 #4:48
  101696 LRCLK edge  157: 00000000 00000000 10110000 00000001  Bits:32 Hex: 0000b001 #5:176
  102347 LRCLK edge  158: 00000000 00000000 11100000 00000001  Bits:32 Hex: 0000e001 #6:224
  102998 LRCLK edge  159: 00000000 00000000 11010000 00000001  Bits:32 Hex: 0000d001 #7:208
  103649 LRCLK edge  160: 00000000 00000000 10100000 00000001  Bits:32 Hex: 0000a001 #0:160
  104300 LRCLK edge  161: 00000000 00000000 01110000 00000001  Bits:32 Hex: 00007001 #1:112
  104951 LRCLK edge  162: 11111111 11111111 10010000 00000001  Bits:32 Hex: ffff9001 #2:-112
  105602 LRCLK edge  163: 11111111 11111110 11000000 00000001  Bits:32 Hex: fffec001 #3:-320
  106253 LRCLK edge  164: 00000000 00000000 00100000 00000001  Bits:32 Hex: 00002001 #4:32
  106904 LRCLK edge  165: 00000000 00000000 01010000 00000001  Bits:32 Hex: 00005001 #5:80
  107555 LRCLK edge  166: 00000000 00000000 01010000 00000001  Bits:32 Hex: 00005001 #6:80
  108206 LRCLK edge  167: 00000000 00000000 00010000 00000001  Bits:32 Hex: 00001001 #7:16
  108857 LRCLK edge  168: 11111111 11111111 11100000 00000001  Bits:32 Hex: ffffe001 #0:-32
  109508 LRCLK edge  169: 00000000 00000000 01010000 00000001  Bits:32 Hex: 00005001 #1:80
  110159 LRCLK edge  170: 11111111 11111111 01100000 00000001  Bits:32 Hex: ffff6001 #2:-160
  110810 LRCLK edge  171: 11111111 11111111 11100000 00000001  Bits:32 Hex: ffffe001 #3:-32
  111461 LRCLK edge  172: 11111111 11111111 11010000 00000001  Bits:32 Hex: ffffd001 #4:-48
  112112 LRCLK edge  173: 00000000 00000000 00110000 00000001  Bits:32 Hex: 00003001 #5:48
  112764 LRCLK edge  174: 00000000 00000000 10110000 00000001  Bits:32 Hex: 0000b001 #6:176
  113414 LRCLK edge  175: 00000000 00000000 10100000 00000001  Bits:32 Hex: 0000a001 #7:160
  114065 LRCLK edge  176: 11111111 11111111 10100000 00000001  Bits:32 Hex: ffffa001 #0:-96
  114717 LRCLK edge  177: 11111111 11111111 10000000 00000001  Bits:32 Hex: ffff8001 #1:-128
  115368 LRCLK edge  178: 11111111 11111111 11100000 00000001  Bits:32 Hex: ffffe001 #2:-32
  116019 LRCLK edge  179: 00000000 00000000 01110000 00000001  Bits:32 Hex: 00007001 #3:112
  116670 LRCLK edge  180: 00000000 00000000 01010000 00000001  Bits:32 Hex: 00005001 #4:80
  117321 LRCLK edge  181: 11111111 11111111 10110000 00000001  Bits:32 Hex: ffffb001 #5:-80
  117972 LRCLK edge  182: 11111111 11111111 01100000 00000001  Bits:32 Hex: ffff6001 #6:-160
  118623 LRCLK edge  183: 11111111 11111111 10110000 00000001  Bits:32 Hex: ffffb001 #7:-80
  119274 LRCLK edge  184: 00000000 00000000 01100000 00000001  Bits:32 Hex: 00006001 #0:96
  119925 LRCLK edge  185: 11111111 11111111 11110000 00000001  Bits:32 Hex: fffff001 #1:-16
  120576 LRCLK edge  186: 00000000 00000000 10010000 00000001  Bits:32 Hex: 00009001 #2:144
  121227 LRCLK edge  187: 11111111 11111111 11110000 00000001  Bits:32 Hex: fffff001 #3:-16
  121878 LRCLK edge  188: 11111111 11111111 11110000 00000001  Bits:32 Hex: fffff001 #4:-16
  122529 LRCLK edge  189: 11111111 11111111 10100000 00000001  Bits:32 Hex: ffffa001 #5:-96
  123180 LRCLK edge  190: 00000000 00000000 00010000 00000001  Bits:32 Hex: 00001001 #6:16
  123831 LRCLK edge  191: 00000000 00000000 01110000 00000001  Bits:32 Hex: 00007001 #7:112
  124482 LRCLK edge  192: 11111111 11111111 01000000 00000001  Bits:32 Hex: ffff4001 #0:-192
  125133 LRCLK edge  193: 11111111 11111111 11100000 00000001  Bits:32 Hex: ffffe001 #1:-32
  125784 LRCLK edge  194: 11111111 11111111 01100000 00000001  Bits:32 Hex: ffff6001 #2:-160
  126435 LRCLK edge  195: 00000000 00000000 11110000 00000001  Bits:32 Hex: 0000f001 #3:240
  127086 LRCLK edge  196: 00000000 00000001 00010000 00000001  Bits:32 Hex: 00011001 #4:272
  127737 LRCLK edge  197: 11111111 11111111 00110000 00000001  Bits:32 Hex: ffff3001 #5:-208
  128389 LRCLK edge  198: 00000000 00000000 10010000 00000001  Bits:32 Hex: 00009001 #6:144
  129040 LRCLK edge  199: 11111111 11111111 10100000 00000001  Bits:32 Hex: ffffa001 #7:-96
  129691 LRCLK edge  200: 00000000 00000000 01000000 00000001  Bits:32 Hex: 00004001 #0:64
  130342 LRCLK edge  201: 11111111 11111111 10110000 00000001  Bits:32 Hex: ffffb001 #1:-80
  130993 LRCLK edge  202: 00000000 00000000 00010000 00000001  Bits:32 Hex: 00001001 #2:16
  131644 LRCLK edge  203: 00000000 00000000 10010000 00000001  Bits:32 Hex: 00009001 #3:144
  132295 LRCLK edge  204: 11111111 11111111 11010000 00000001  Bits:32 Hex: ffffd001 #4:-48
  132946 LRCLK edge  205: 00000000 00000000 00010000 00000001  Bits:32 Hex: 00001001 #5:16
  133597 LRCLK edge  206: 11111111 11111111 01000000 00000001  Bits:32 Hex: ffff4001 #6:-192
  134248 LRCLK edge  207: 00000000 00000000 11100000 00000001  Bits:32 Hex: 0000e001 #7:224
  134899 LRCLK edge  208: 00000000 00000000 11110000 00000001  Bits:32 Hex: 0000f001 #0:240
  135550 LRCLK edge  209: 00000000 00000000 00010000 00000001  Bits:32 Hex: 00001001 #1:16
  136201 LRCLK edge  210: 00000000 00000000 01100000 00000001  Bits:32 Hex: 00006001 #2:96
  136852 LRCLK edge  211: 11111111 11111111 10010000 00000001  Bits:32 Hex: ffff9001 #3:-112
  137503 LRCLK edge  212: 11111111 11111111 01100000 00000001  Bits:32 Hex: ffff6001 #4:-160
  138154 LRCLK edge  213: 00000000 00000000 01100000 00000001  Bits:32 Hex: 00006001 #5:96
  138805 LRCLK edge  214: 11111111 11111111 00000000 00000001  Bits:32 Hex: ffff0001 #6:-256
  139456 LRCLK edge  215: 11111111 11111111 10000000 00000001  Bits:32 Hex: ffff8001 #7:-128
  140107 LRCLK edge  216: 11111111 11111111 11000000 00000001  Bits:32 Hex: ffffc001 #0:-64
  140758 LRCLK edge  217: 11111111 11111111 10010000 00000001  Bits:32 Hex: ffff9001 #1:-112
  141409 LRCLK edge  218: 11111111 11111111 11000000 00000001  Bits:32 Hex: ffffc001 #2:-64
  142061 LRCLK edge  219: 00000000 00000000 01110000 00000001  Bits:32 Hex: 00007001 #3:112
  142712 LRCLK edge  220: 00000000 00000000 01110000 00000001  Bits:32 Hex: 00007001 #4:112
  143363 LRCLK edge  221: 00000000 00000000 10010000 00000001  Bits:32 Hex: 00009001 #5:144
  144014 LRCLK edge  222: 11111111 11111111 11010000 00000001  Bits:32 Hex: ffffd001 #6:-48
  144665 LRCLK edge  223: 00000000 00000000 01100000 00000001  Bits:32 Hex: 00006001 #7:96
  145316 LRCLK edge  224: 11111111 11111111 11000000 00000001  Bits:32 Hex: ffffc001 #0:-64
  145967 LRCLK edge  225: 00000000 00000000 11110000 00000001  Bits:32 Hex: 0000f001 #1:240
  146618 LRCLK edge  226: 11111111 11111111 11110000 00000001  Bits:32 Hex: fffff001 #2:-16
  147269 LRCLK edge  227: 11111111 11111111 11000000 00000001  Bits:32 Hex: ffffc001 #3:-64
  147920 LRCLK edge  228: 11111111 11111111 10010000 00000001  Bits:32 Hex: ffff9001 #4:-112
  148571 LRCLK edge  229: 11111111 11111111 11110000 00000001  Bits:32 Hex: fffff001 #5:-16
  149222 LRCLK edge  230: 00000000 00000000 01100000 00000001  Bits:32 Hex: 00006001 #6:96
  149873 LRCLK edge  231: 000000
Every N samples (actually every 384 samples), there are two sample with LSB set to 0x09 rather than 0x01. Counting the channels as seen on the front-panel from 1 to 16, these are marking channels 1 and 2 in the first data stream. Channels 8 & 9 are I expect marked in the same way, although I don't have a second WM8804 running on that channel yet.

Thursday, July 09, 2015

Low-noise +/-12v linear power supply for Phono Preamp

Ages ago, I built a John Linsley-Hood design of phono preamp, first published in ETI magazine in 1992. This was considerably better than the phono stage in the integrated amp I was using at the time (a Creek CAS4040).

For a couple of decades I ran this from my bench power supply, so it was definitely time for its own PSU.  Rather than etching my own circuit board, nowadays kits are available via eBay that save a lot of that messy work.  I wanted something based on the LM317 / LM337 regulators, as they are known to have superior noise performance and regulation compared to the standard 7812 / 7912 family.

I started with this kit.  Unpacking, you have a bag of bits and a very nice looking double-sided, through-hole-plated, silk-screen-printed PCB - way better than you can make yourself.  And the total price of the kit is less than you'd pay from a regular supplier for the parts.  The large electrolytic caps are Sanyo branded, and look genuine to me.


Here's a view of the PCB sides:


The negative regulator is branded "On" which is On Semiconductor, formerly Motorola.


I filed down the burrs on the heatsink holes, removed the anodization/paint with a small file, and applied some PC heatsink paste.  Probably overkill, considering that the preamp will draw less than 100mA, but better than overheating.


here's the regulators mounted on the heatsinks, ready to insert in the board.


The circuit diagram supplied with the kit didn't quite match the PCB & kit of parts.  Here's a marked-up version of the diagram:


The bypass capacitors around the full-wave rectifier diodes were interesting - I hadn't seen those before.  I found this site and this article which explains what they're for.

Even with the caps in place, some ringing is evident when looking at the transformer secondary taps. While I'm somewhat skeptical that this would ever be audible, let's see if we can do better, based on that second article.

Firstly, let's add 330R dummy load resistors, so we can test the circuit behaviour without endangering the regulators.


The ringing is definitely there on the transformer secondary output:


Here's a closeup of the rising and falling edge ringing:


Now let's add 180R in series with each of the 100n snubber caps.  It's a little bit awkward to fit this into the existing PCB, but it's possible.

Here's the improved damping result.


Here's the improved R-C snubbers in place.


Looking at the 12v outputs, they're pretty clean, with noise below 1mV on each rail.


Ready to connect to the preamp.  I used a trailing 7-pin DIN socket for the power (using pins 6 & 7 for -/+12v so they can't be mistakenly connected to audio inputs).


12v-12v secondary transformer and surge-protected IEC input.

The finished power supply, mounted inside an ABS box from CPC.


I found that, when the preamp is connected to other devices such as USB sound-cards, hum levels were reduced when the power supply 0v output was not connected to mains earth. Perhaps the PC was already earthing via the sound-card and it was just introducing a ground loop.

Friday, July 03, 2015

Simple electronic water leak detector

The following circuit is a very simple water leak detector, which I made 25+ years ago (!!) following my fiancée having a washing machine go wrong and leak all over her apartment.


The circuit is not ideal - there are better designs out there. It was built with 'what I had in my scrapbox at the time'.  It's purely analog, relying on the gain of the Darlington pair to provide reasonable on/off behaviour. This can actually be an advantage, as the sound will get louder as the leak becomes more serious and conducts more water.

The transistors used are not critical. I used BC108Cs.

Battery current drain is essentially zero (too low to measure on my meter) when there's no conduction.

The physical construction had a few hacks which surprised me when I took it apart again.

- The self-tapping screws are used both to hold in the buzzer, and act as the electrodes.  Kind-of-neat, but soldering on to them was a nasty little shortcut I'm not proud of!
- The battery is just held in with double-sided tape.  Good enough for something that's rarely changed.
- The circuit board is just loose in the box. Actually I had held it in place with blu-tak before, which was horrible. But the blu-tak seems to absorb moisture and prevents the circuit working properly.
- The plastic box would cut down the sound level too much. So it has holes cut in the box lid to let the sound out.  These holes are then "sealed" using a blu-tak 'grommet' and thin plastic.  Reasonable compromise between letting the sound out and not letting water in!

Here's a pic of the insides.


Nowadays, cheap commercial solutions are easily available such as this.

Thursday, October 10, 2013

Simple Optical Compressor for bass guitar - construction

An extremely simple yet capable compressor circuit is published by Elliott Sound Products, here:  http://sound.westhost.com/project45.htm

Compressor Mk I

I built the circuit exactly as-is (in an Altoids tin). 

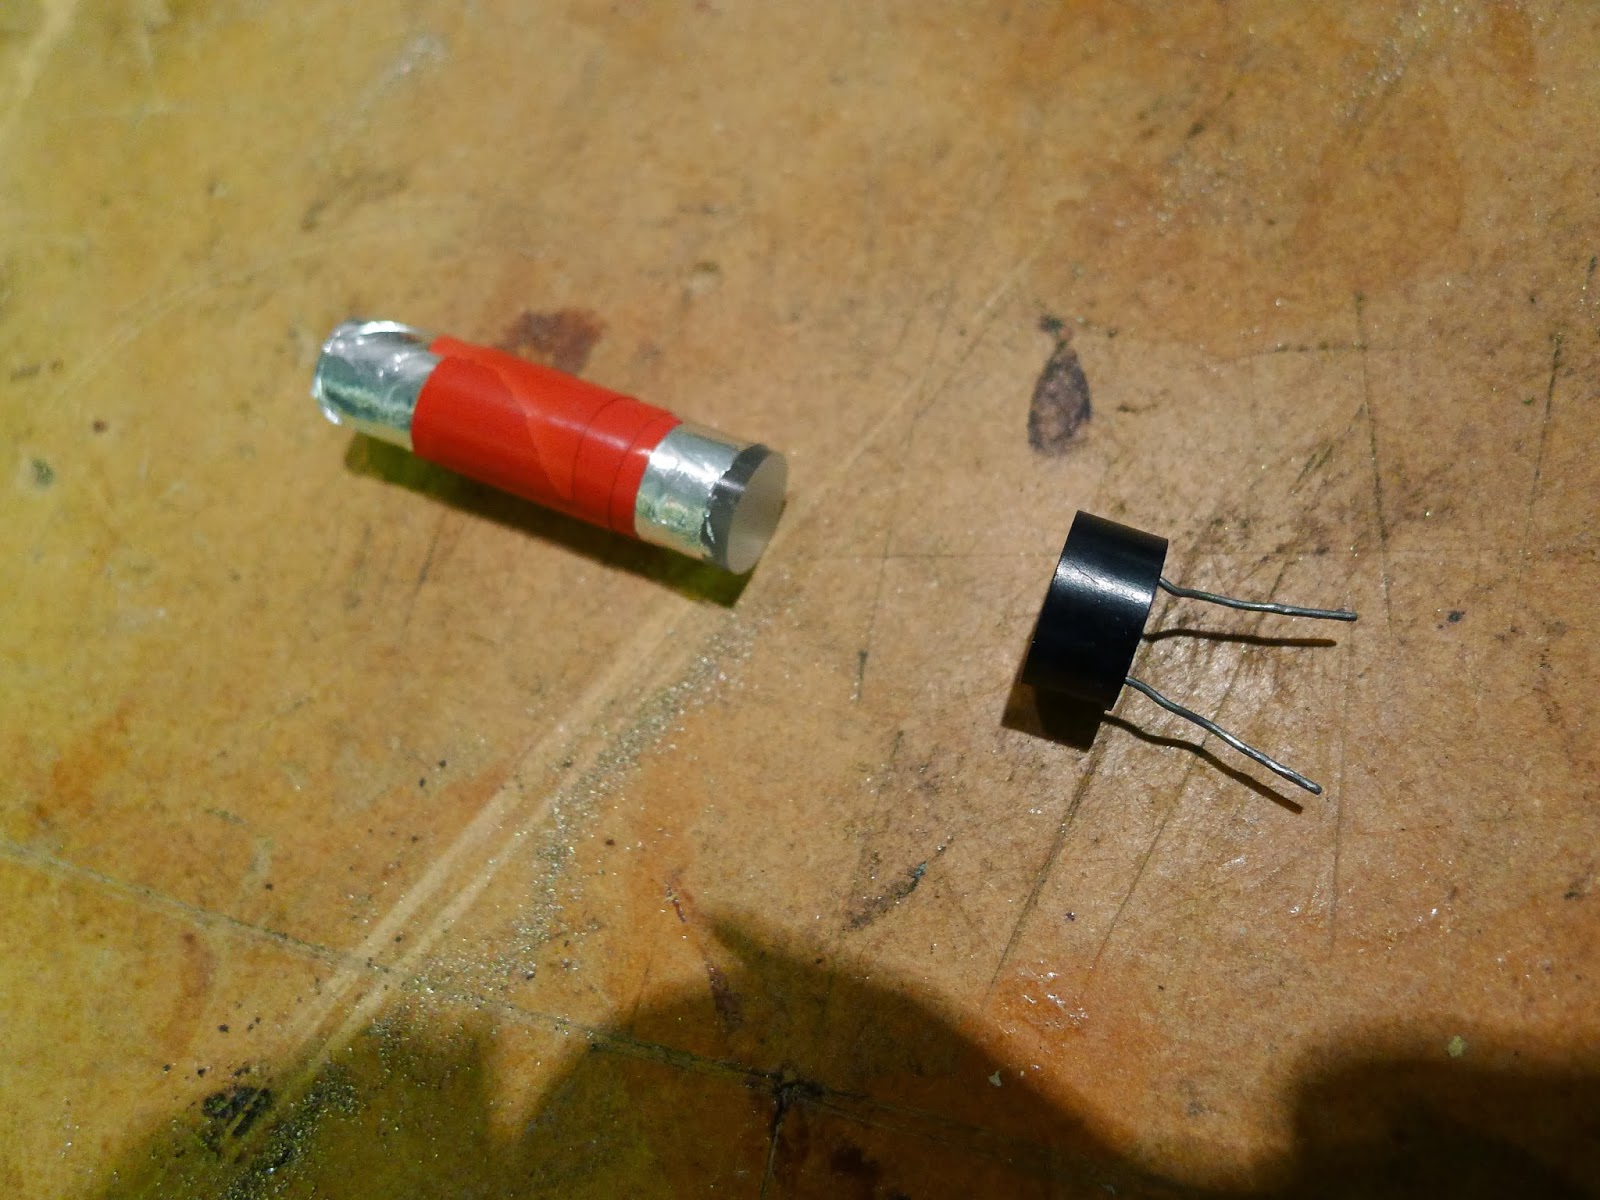
Care was taken to optically couple the bulb to the photocell (LDR), using a perspex rod, wrapped in smooth tin-foil.  The perspex came from eBay:
http://stores.ebay.co.uk/thewholesaleposco2009

as did the miniature "Grain of Wheat" bulbs:  http://stores.ebay.co.uk/GnA-MODELPARTS?_trksid=p2047675.l2563


This was put together, and sealed in heatshrink tubing, to make it fairly lightproof from external light sources.  The rest of the components came from http://cpc.farnell.com (free postage) or from my junk box.


Here's the final assembly.  The green wire provides grounding (shielding) for the tin-foil, as per the original article description.


Here's the finished article.  The Altoids tin was really too small, so I had to cut notches in the lid, which rather spoiled the look.

The duck tape on the bottom of the box provides insulation.  The whole tin is effectively coupled to the amp "earth" via the jack socket outer rings.


I soon discovered the following:
  • Using jack-sockets to carry high-current, low-impedance amp output signals is a very dumb idea.  I knew this before, I just kind-of forgot it in the urge to get everything to fit in an Altoids tin.  Even with the amp output muted (but powered), I got a fat blue spark when unplugging the box.
  • The "grain of wheat" bulbs don't really get into their proper operating range of brightness when you have an efficient speaker cabinet (like a www.barefacedbass.com one) - even when the variable resistor is turned right up.
My amp has an FX send / return loop, so I was using that for the input side (on the left).  The two speaker sockets (on the right) were there in case a "pass thru" was needed, although again my amp has two speaker-outs, so no need to use that in practice.

I was a bit concerned about the way the tin was earthing together the FX send/return loop with the "-" side of the amp output.  It worked fine for the two amps I tried, but what would happen if it was connected to an amp in bridge-mode where the "+" and "-" sides were both driven?  Clearly not ideal.

Compressor Mk II

 Mk II was going to be built in a proper case, with a Speakon plug on a trailing lead (so it simply cannot be plugged in wrongly), and would use a high-efficiency LED with suitable dropper resistors instead of the bulb (so as to be more effective at low amp output levels).

It would also have electrical isolation between the amp out / speaker side, and the delicate FX send/return loop (which will be used for a shielding / ground connection for the case).

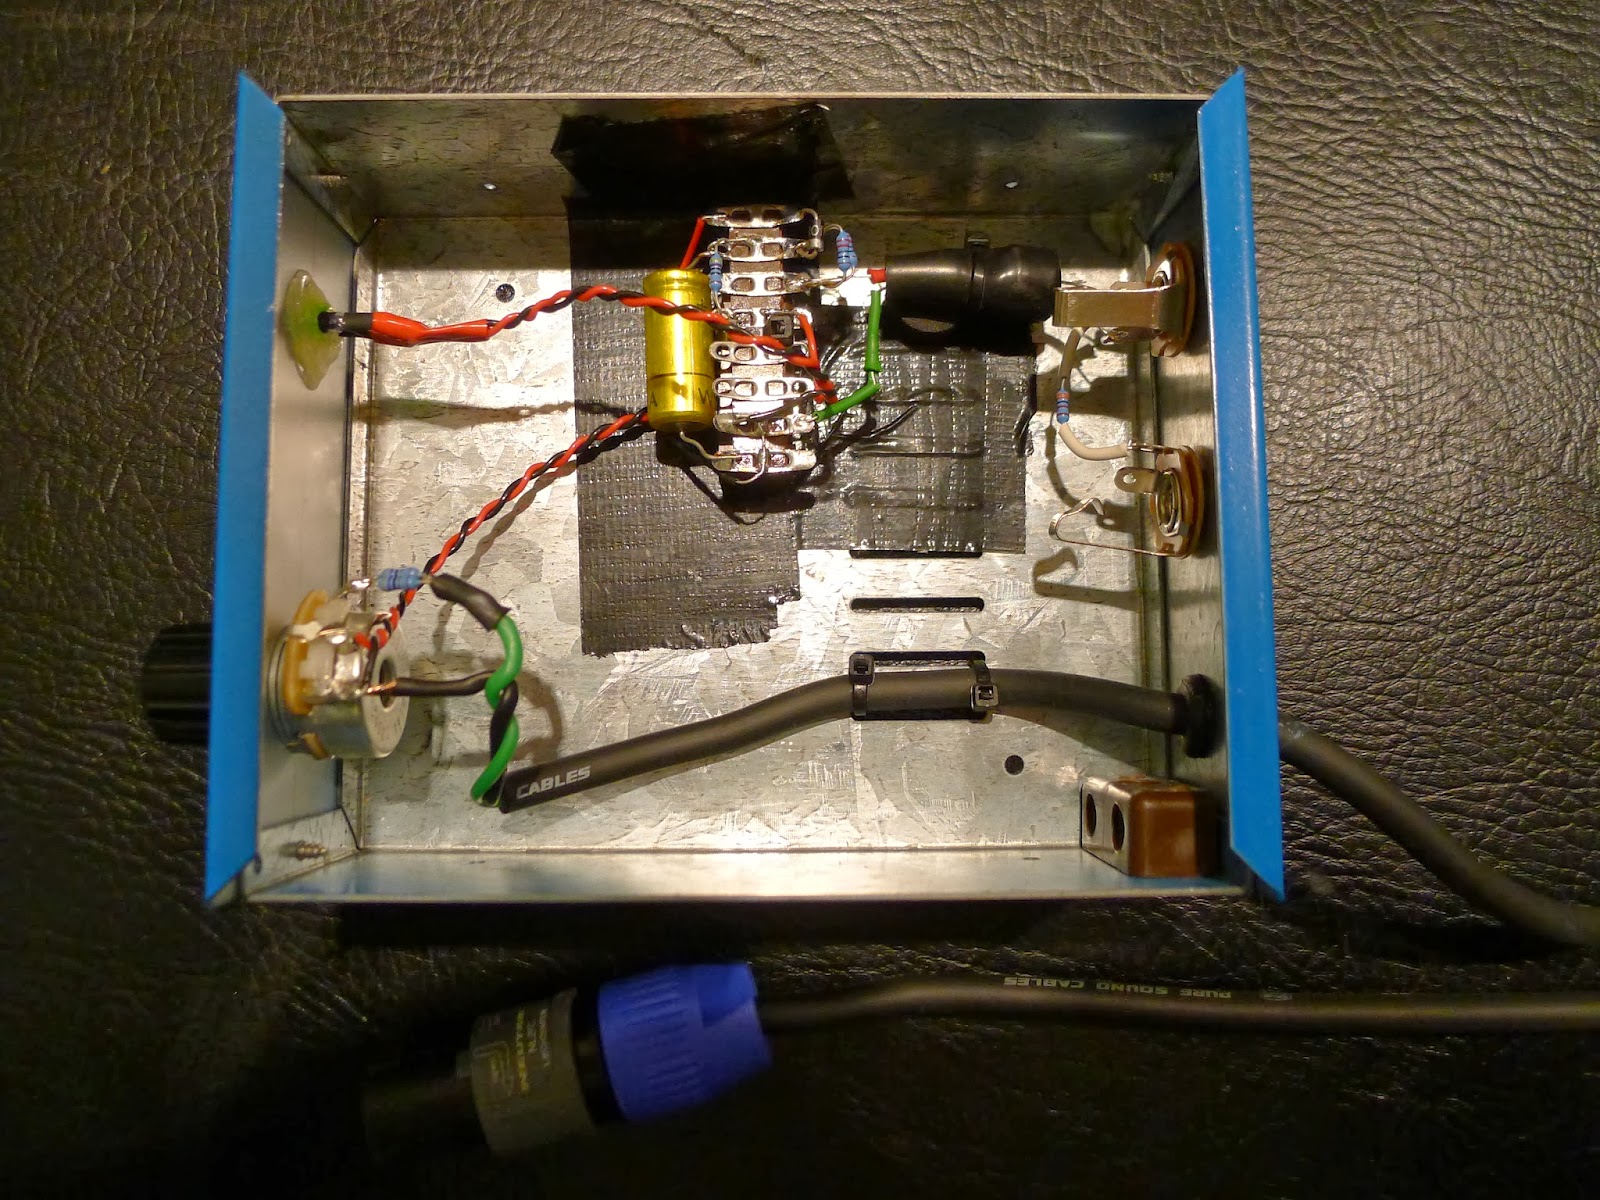
Here it is:

The Speakon cable enters through a grommet, is double tie-wrapped to the floor of the case, so even your clumsy drummer friend shouldn't damage it.

The variable resistor is a 5 watt, 500 ohm type which I found on eBay:
http://stores.ebay.co.uk/Interesting-Electronics?_trksid=p2047675.l2563

You'll notice a pair of 47 ohm fixed resistors, in parallel, on the green input wire next to the variable resistor.  In parallel that makes around 24 ohms.  The purpose of that, is to prevent the last little bit of the variable resistor's track dissipating a lot of power.  In fact it's hardly necessary as the LEDs use less power than the bulbs.  I used two small resistors in parallel because they have a low power rating (I think 1/4 watt) and didn't want them to get too hot.

Because LEDs can "flash" much faster than a bulb can, and only respond to current in one direction, we need a "rectifier and smoother" circuit.  This is what the small diode and big  capacitor does.

The capacitor is 470uF, 25v (from the junk box).  Voltage rating is important, as your amp can produce quite high peak voltages.  Make sure you use at least a 25v rated one, higher if you can - preferably 63v.


The output of the capacitor feeds two separate LED circuits.  The first one has 2x 220 ohm in parallel (effectively 110 ohm) feeding the high-efficiency LED that is inside the shrink wrap.  Because the LED light output is very directional, I did not use the perspex rod - I just put the LED right up against the front face of the LDR.

The second circuit goes through 470 ohms to a small front-panel LED.  The idea being that you can see what the compressor is doing from the outside.

The final part of the circuit is the same as the Elliott original.  A 33k resistor couples the input side (amp:  FX SEND) to the output side (amp:  FX RETURN), forming a potential divider with the LDR.


With the lid off in the dark, you can see both LEDs are working together.


The case was sprayed a non-Ashdown blue, and a nice quality collet knob from CPC/Farnell added.

The final circuit seems to work well - the component values will need some tweaking to suit your amp / cabinet combination.  If you want a circuit that is less sensitive to amp/cab variations then you might want to look at the other Elliott pages.

Circuit diagram:
Free download in PDF
and ExpressPCB .sch format (R-click / Save As) .. software available here


Thursday, July 11, 2013

Sony Vaio VPCEB4L1EWI - Heatsink clean and refit

This time, it's a Sony Vaio VPCEB4L1EWI, with i3-380M CPU.  About two years old.  Running Prime95 stress test, the cores were reaching 85 deg C and the fan was rather noisy.

1.  Strip off the back plate, undoing all the visible screws, taking careful note of where they all go back - there are several different sizes and types.  The back plate then snaps off - be careful with the small white lugs on the upper side here.  One came off despite me taking care. 

Always wear an anti-static wrist strap, connected to a metal part of the laptop (e.g. the USB connector) when working.


2.  Here is the heatsink / heat pipe / fan assembly removed.  The grey heatsink paste had set quite hard.

 
3.  Clean up the CPU top surface carefully with meths, a cloth, and cotton buds. 

 
 4.  Clean all the old paste off the heatsink.
 

5.  To do a really good job, "flat" the heatsink down with a diamond file, cleaning the copper dust off regularly.  I kept applying a few drops of meths as a non-greasy lubricant while working.

After a few minutes you should be able to get a near mirror-finish on the heatsink.  Don't over do it - copper is a very soft material.

7.  Apply a new heatsink paste (I used Arctic MX-4), and re-assemble the machine.

Measuring the core temperature with "CPUtemp" and running "Prime95" stress test, the peak core temp reached 68 deg C instead of 85, and the fan ran much quieter as a result.

Friday, June 07, 2013

Building a quick & easy website .. pros and cons

Just finished the first draft of a website for my wife's home tutoring business.  I used the free web site builder tools from serversfree.com, and they're not bad.  A few things we came across were a bit frustrating however:

  • Once you've chosen your template, the background image (in our case, of the coloured pencils) seems to be unchangeable
  • There's no "undo" button, so use the "Save and Publish" option frequently to avoid losing work
  • When you create a new menu item (on the top row, in our case), it throws away work you've just done on your current page, so save it first!
  • Working with images is somewhat frustrating in terms of positioning, resolution etc

There are also good things about the sitebuilder:  The sites look good on iPhone and Android devices as well as on a PC / Mac.


I also noticed that when running this auto-generated page through W3C Validator, it finds 5 "errors".   Hmmm.

I looked around for help pages, or a forum on this website builder too, to no avail.  Anyway I should probably be using something "proper" like Wordpress, Joomla or even good old Dreamweaver.  Thoughts /comments appreciated.

Monday, February 04, 2013

Improving an Ashdown Little Giant bass amplifier

I have an Ashdown Little Giant amp.  Several reviewers have mentioned that this amp is not at loud as it should be (e.g. here).

It all depends on whether the output levels coming from your bass are enough to drive the output stage fully.  I have an active bass, but even with the input set on max, to get a decent output level I need the output volume control set to around 3 o'clock.

While there are workarounds available, e.g. use an effects send/return through a pedal which has some gain, I wanted a simple 'no extra boxes' solution to go with my lightweight cab.

A nice chap called Wilfried Klaas has come up with what I consider to be the perfect solution to this - adding an extra small preamp (gain) stage inside the amp itself. His web page (in German) describes this improvement.

Wilfried was very helpful and supplied me a ready-made amp board for around €15.00.  This was fairly straightforward to fit.  I've recorded the process of testing the amp, fitting the board, and re-testing the amp.

Incidentally - my amp, purchased off Ebay, started off life as a green-front, LG350.  However something strange had been done to it, the fan was wired to run continuously off the 12v supply, rather than being connected to the variable-speed fan output.  Eventually the power module failed, and it went back to Ashdown, who replaced it with a Powersoft Digimod 1000 module.  Only one side is connected and used, so I have effectively an "LG500".

1.  Measure the amp's existing output

First, I hooked up the amp's instrument input to a sine-wave source.  I used a 1kHz, 0dB digital source which you can get hold of from here.  This was loaded as a .wav file onto an IPod.  The output from the iPod was checked on a scope; above 90% volume there were some signs of clipping (presumably the iPod's headphone output stage).  This input level was just enough to light up the 'peak' light on the LG's input stage.

The amp output was connected to a 4 ohm dummy load, which I made as follows - two 8.2 ohm resistors on big heatsinks, connected in parallel, as shown here.


For the actual test, these were placed on a metal tray, on a wooden board, as they will get hot if you run the amp into the loads for more than a few seconds.

With a sine wave input, the amp produced a maximum output of around +/- 60 volts peak, shown here:

 The RMS power in a sine wave is

    (V^2 / R) / (sqrt(2))  =  (3600 / 4) / 1.41 = 636 watts

After a few seconds,  some kind of power limiter kicks in, presumably in the power amp module itself, and the output falls to 44 volts peak, which is

     (1936 / 4) / 1.41 = 343 watts.

So the amp can produce more than the rated power (for short periods), the problem is down the lack of gain.

2.  Fitting the "Wilfried Klass" buffer stage

Firstly, switch the amp off and unplug the mains lead, leaving the load connected to dissipate the internal power, and take the top off the amp case.  The cooling fan has a 3-pin connector which looks very similar to PC-type cooling fans, this is easy to remove.

Inside of Little Giant amp

The white wires on the bottom left carry mains electricity, and even the +/- 60v output from the amp could deliver a shock, so always work with the power off.

The module requires + / - 12v DC power and an earth, which are obtained from the green connector following Wilfried's instructions.

Power connector On Digimod 1000 module


The next step is to find and break into the grey ribbon cable that goes from front to back. , on the right side of the amp.

The third wire from the bottom carries the preamp signal.   This needs to be picked out of the ribbon and cut into.  I used the scope at this point to check that the sine wave signal was indeed on pin 3

before I cut into it.   I broke into the cable carefully using a craft knife:

The buffer circuit is then connected up, with the input coming from the front panel, and the output going towards the back panel:


 I then powered up and tested the amp was working, but this time maximum output was reached (before onset of clipping) at a lower setting on the output knob.  The limiter behaviour is the same as before.

Finally, the buffer circuit was fitted into the insulating sleeve supplied by Wilfried (red colour in the picture below).  I used double-sided sticky tape to secure this to the inside of the case, and tie-wraps to keep the wiring in place.


Having just used the amp in a band rehearsal, I would say it's a great improvement - performance volume levels can be reached, while there's still some 'reserve' on the output knob.  There is no appreciable increase in the level of hiss or hum from the amp (it's pretty quiet both before and after the mod).

So thanks to Wilfried for making an OK amp (available for reasonable money on EBay) into a great little amp.